Recording video calls with YouTube Live
Telecollaboration is a new teaching tool that allows students in different locations to do assignments and communicate with each other and their lecturers online. The most common form of telecollaboration is the video call. Students can record their video calls so that they can review them later, and the recordings can also be used for assessments and portfolios. This article provides instructions on how to record a video using YouTube. The recordings will not be made public (the student decides who can see them).

How does it work?
-
Log in to YouTube with your University of Groningen e-mail address.
-
There are a few steps you will need to take before you can start recording.
-
If you haven't created a channel yet, read how to do this. Otherwise, go to the next step.
-
Method A: Open the menu at the left side of the window by clicking on the menu icon (three horizontal lines) to the left of the YouTube logo. Then click on 'My channel' and subsequently on 'Video Manager’ (top middle of the page).
-
Method B: If there is no 'My channel' option in the menu, click on 'Browse channels' and then on 'My channel'. On the right side of the page, you'll find a button CREATOR STUDIO. Click on it.
-

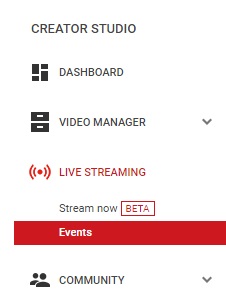
- In the CREATOR STUDIO menu on the left side, click on ‘Live Streaming’ and then on ‘Events’.

- Finally, click on 'New live event'

- Enter the requested information, such as the title of the recording. Use the default Type (‘Quick’).
- Important: Switch the privacy setting to ‘Private’ to ensure that no one else can view your recording. You can choose who to grant access to later.
- Click on ‘Go Live Now’.

- Google Hangouts will now be opened, but the broadcast (and recording) will not start yet. You can now adjust your microphone and camera and invite the other participants. To do this you can call up a menu bar by moving the mouse pointer to the top of the screen. Click on ‘Invite People’ (on the left) and enter the e-mail addresses of the other participants.

- After a while you will see the button 'Start broadcast' appear at the bottom of the screen. Click on this button to start the call and the recording. The call is made using Google Hangouts, so you can use all the standard Hangouts options, such as screen sharing.
End the session by clicking on ‘Leave call’ in the menu bar (red telephone icon). You can also opt to end only the recording (by clicking on ‘Live’), so you can continue talking with the other participants after you have finished recording.
After the recording; sharing, editing etc.
The recording can be viewed on YouTube on the ‘Events’ page where you started the call. To return to this page, follow the steps above again (My Channel > Video Manager> Live Streaming > Events).

To share the recording, click on ‘Edit’ in the Video Manager (next to the video).

Make sure to leave the privacy settings on ‘Private’. You can enable others to watch the recording by clicking on ‘Share’ and adding their e-mail addresses. They will only be able to view the recording after they have logged in to the relevant YouTube account.
There are various editing options available in YouTube (see the online help pages for detailed instructions). We have provided a few of the most commonly used options below, which you can access under Edit > Enhancements.

-
Delete the beginning and/or end.
Go to Edit > Enhancements and click on ‘Trim’.
Move the vertical slider bars on the left and right of the timeline to choose when the recording should begin and end. Save the changes to the original or a new recording.
- Blur faces. Go to Edit > Enhancements and then select ‘Blurring Effects’. YouTube can detect the faces in the video and blur them to make them unrecognizable.
- Add titles and labels. Go to Edit > Annotations, where you can add titles, labels and hyperlinks.
More information
YouTube Help:
| Last modified: | 16 August 2023 11.29 a.m. |
